…
Table of Contents:
- HVM BIOS Configuration Requirements
- Step 1 – Download ISO File
- Step 2 – Create HVM DomU Logical Volume
- Step 3 – Create HVM DomU Configuration File
- Step 4 – Install HVM DomU Operating System
- Step 5 – Modify DomU Configuration File
- Step 6 – Start HVM DomU
- Troubleshooting
…
Now that we’ve covered creating and deleting paravirtualized (“PV“) virtual machines in Xen Project, it’s time to learn how to create a hardware virtual machine (“HVM”). In this guide, we install the latest version of FreePBX Distro, an open source communications server, on a HVM DomU.
First things first. Why choose HVM instead of PV?
The simplest answer to this question is that PV operating systems (“OS”) aren’t always available. In other words, OS providers don’t always supply Xen-aware, PV versions of their releases. That’s where HVM comes in handy: if there’s no PV version available, the user still has the option of installing the operating system using a HVM DomU.
As with previous tutorials, this guide uses Xen Project Hypervisor version 4.8 as included in the old stable release of Debian 9 (Stretch), the operating system installed on Dom0.
HVM BIOS Configuration Requirements
As HVM instances require hardware emulation at the hardware level, your system’s BIOS settings must be properly configured. BIOS settings required to run a HVM DomU include the following enabled and disabled options:
- VT-x needs to be enabled [aka Virtualization Support or Hardware Virtualization]
- IOMMU needs to be enabled [aka Intel VT-d or Hardware IOMMU]
- TXT needs to be disabled [aka Trusted Execution Technology]
A common source of frustration for first-time HVM users is that VT-x is disabled by default in most BIOS. This is complicated by the fact that error messages encountered when running an “xl create” command on a VT-x disabled machine are not necessarily explicit. For example, with VT-x disabled, the xl create error message may resemble this output:
# xl create /etc/xen/hostname.cfg
Parsing config from /etc/xen/hostname.cfg
libxl: error: libxl_create.c:564:libxl__domain_make: domain creation fail: Invalid argument
libxl: error: libxl_create.c:928:initiate_domain_create: cannot make domain: -3
Luckily, the VT-x status of your Xen system may be confirmed by running the “xl dmesg” command in Dom0.
# xl dmesg | grep -i vmx
If VT-x is disabled, you should find the following lines in the resulting output:
(XEN) CPU0: VMX disabled by BIOS.
(XEN) VMX: failed to initialise.
Otherwise, if VT-x is enabled, expect to see the text:
(XEN) VMX: Supported advanced features:
(XEN) HVM: VMX enabled
Similar information for VT-d, and other relevant BIOS configuration options, may also be found in the output of the xl dmesg command.
Step 1 – Download ISO File
In this guide, we’ve chosen to install the HVM DomU operating system using an ISO file available on the FreePBX Distro website (link). The ISO file should be downloaded and stored on the Dom0 operating system making it accessible to the new DomU when the xl create command is executed in Step 4, below.
The FreePBX Disto version used in this tutorial is SNG7-PBX-64bit-1910, which ships with FreePBX 15, Linux 7.6, and Asterisk 13 or 16 (your choice).
Step 2 – Create HVM DomU Logical Volume
Once the ISO has been downloaded, it’s time to begin the HVM DomU creation process. At this point, we need to manually create a disk or partition to be used as the DomU’s virtual hard disk.
For our current purposes, we’re going to create an 8GB[1] logical volume named “freepbx-disk” in LVM volume group “vg0”. Since the vg0 volume group already exists in Dom0, we use lvcreate to create the logical volume.
# lvcreate --name freepbx-disk --size 8G vg0
Verify that the volume was successfully created by checking the output of “lvs”.
# lvs
For more information on configuring LVM volume groups or logical volumes, check out the tutorial A Quick Guide for Configuring LVM.
Step 3 – Create HVM DomU Configuration File
Now that we’ve created a logical volume to install the DomU operating system on, we need to create the HVM DomU’s configuration file. As with PV instances, the default directory to store HVM .cfg files is /etc/xen.
Using the nano text editor, the following key=value pairs are added to the new configuration file.
# nano /etc/xen/freepbx-hvm.cfg
builder     = 'hvm'
memory      = '4000'
vcpus       = '1'
name        = 'freepbx'
vif         = [ 'bridge=xenbr0' ]
disk        = [
                'phy:/dev/vg0/freepbx-disk,hda,w',
                'file:/home/user/SNG7-FPBX-64bit-1910-2.iso,hdc:cdrom,r',
                ]
boot        = 'd'
serial      = ['pty']
Here’s a rundown of what the above values represent:
- builder = ‘hvm’ is required to specify to Xen that a HVM DomU is to be created as opposed to the default PV type DomU,
- memory = ‘4000’ sets the DomU’s allocated memory as 4000MB,[2]
- vcpus = ‘1’ sets the DomU’s allocated CPUs as 1,
- name = ‘freepbx’ sets the DomU’s domain name in the Xen environment as “freepbx”,[3]
- vif = [ ‘bridge=xenbr0’ ] specifies that the new DomU will use the “xenbr0” network bridge for network connectivity as configured in Dom0,[4]
- disk = […] specifies that logical volume “/dev/vg0/freepbx-disk” will be allocated to DomU as a virtual disk, and that the virtual cdrom will load the FreePBX Distro SNG7-FPBX-64bit-1910-2.iso ISO file to install the operating system. Note that the ISO file has been downloaded and saved in the “/home/user” directory of the Dom0 operating system,[5]
- boot = ‘d’ specifies the virtual device to boot from. The options are hard disk (c), cdrom (d), and network (n). Since we’re installing the operating system from an ISO file attached to the virtual cdrom, we want this value set to “d”,
- serial = [‘pty’] specifies that the DomU should redirect the virtual serial port to a new pseudo TTY so we can see what’s going on.
IMPORTANT: To avoid potential confusion later on, note that the boot=’d’ option is required when the operating system is initially installed from an ISO file. However, once the operating system has been successfully installed, boot=’d’ needs to be changed to boot=’c’ so that the DomU boots from the virtual disk rather than the ISO.
For more information on DomU configuration files and the key=value pairs described above check out the xl.cfg manual page.
$ man xl.cfg
Step 4 – Install HVM DomU Operating System
After creating the new DomU’s logical volume and configuration file, we’re ready to use the “xl create” command to install the operating system. Use the “-c” option to pass the current Dom0 console to the new DomU’s console, and follow the OS installation steps.
# xl create /etc/xen/freepbx-hvm.cfg -c
After the HVM DomU configuration is parsed by Xen, the following FreePBX Distro menu appears.
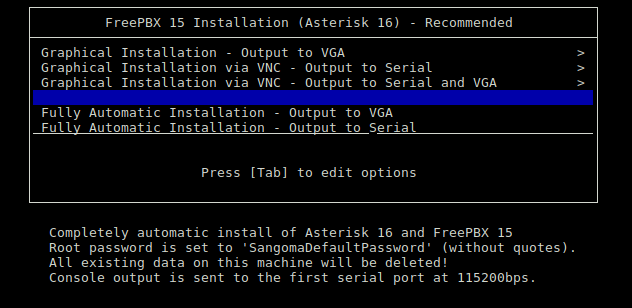
If you only have terminal/SSH access to the Dom0, and do not have VNC installed or configured, selecting the “Fully Automatic Installation – Output to Serial” may be your only functional option. For this tutorial, the FreePBX Distro OS was installed using the Fully Automatic Installation – Output to Serial option.
After the FreePBX Distro installation process completes, the new operating system prompts you to reboot the DomU.
IMPORTANT: Note that when the DomU reboots, it automatically boots back into the ISO file installation media – not the virtual disk with the installed OS. This is because the DomU’s configuration file “boot” value is still set to “d”, or cdrom – this needs to be manually changed to boot into the installed operating system.
At this point use “xl destroy” to force shutdown of the DomU so that the configuration file can be modified and the HVM instance properly started.
# xl destroy freepbx
Executing the command “xl list” will show all currently running instances – “freepbx” should not be listed if it has been properly destroyed.
# xl list
Step 5 – Modify DomU Configuration File
With the DomU shutdown, we now modify the HVM configuration file setting the boot value to “c”.
# nano /etc/xen/freepbx-hvm.cfg
The configuration file should now contain the following key=value pairs:
builder     = 'hvm'
memory      = '4000'
vcpus       = '1'
name        = 'freepbx'
vif     	= [ 'bridge=xenbr0' ]
disk        = [
                'phy:/dev/vg0/freepbx-disk,hda,w',
                'file:/home/user/SNG7-FPBX-64bit-1910-2.iso,hdc:cdrom,r',
                ]
boot        = 'c'
serial      = ['pty']
Step 6 – Start HVM DomU
Running the xl create command should now bring up the FreePBX Distro as installed on the HVM DomU disk.
# xl create /etc/xen/freepbx-hvm.cfg -c
If you’ve followed all steps correctly, you should be looking at the login prompt for the newly installed FreePBX Distro OS. To login to the DomU through terminal, the “root” user has the default password set to “SangomaDefaultPassword”.
Better still, the FreePBX HTTP GUI should show up when you connect to the server IP with your web browser.
Troubleshooting
- Is your BIOS properly configured to allow for HVM instances?
- Is your logical volume large enough to accommodate the OS hard disk requirements?
- Have you allocated enough memory to satisfy the OS memory requirements?
- Is your HVM configuration file boot option set to “d” if you are using an ISO file to install the OS?
- Is your HVM configuration file boot option set to “c” if you are trying to boot the installed OS?
- If you keep booting to the ISO after changing the boot option to “c”, have you tried killing the DomU with xl destroy and restarting it?
- If you are installing the new OS over a SSH connection and are “losing connection” once the install is initiated, are you selecting an install option that is compatible with the serial console?
Footnotes:
[1] Note that 8GB may be too large, or too small, depending on the intended use of your HVM instance. For the FreePBX Distro setup, the auto-install option created three partitions on this 8GB volume: a 2GB /boot partition, 4% used; a 5GB / partition, 76% used; and a 829MB swap partition. Research the minimum and recommended disk and memory requirements for your intended OS.
[2] Note that the FreePBX Distro HVM DomU’s used ram after boot was 461MB.
[3] Note that “domain name” in this context refers to the name of the DomU (i.e., Domain User), or virtual machine instance, and has nothing to do with “domain name” as it concerns networking or the Internet.
[4] See https://xenbits.xen.org/docs/unstable/man/xl-network-configuration.5.html
[5] See https://xenbits.xen.org/docs/unstable/man/xl-disk-configuration.5.html