The purpose of this tutorial is to show how to connect a client computer to a Xen Project Dom0 using the remote desktop protocol (“RDP”) tunneled through SSH. The information provided below may also be useful to individuals attempting to configure any client-to-server RDP connection.
This tutorial assumes a Xen Project Dom0 is installed on the computer set to run the RDP server, and that the Dom0 has a working desktop environment (e.g., MATE, LXDE, XFCE, etc.). For more information on installing a Xen Project Dom0, refer to the tutorial Installing Xen Project Hypervisor on Debian 10.
This tutorial also assumes (1) the Dom0/RDP server is located on a network protected by a firewall/router, (2) the router is configured to forward SSH connections through to the Dom0, and (3) the client computer is located on a network different from the Dom0.
Example client/server locations

If your plan is to keep both client and server within the same network, information is provided below on how to access the server from within the same LAN.
Software used in this tutorial includes the Remmina remote desktop client and the Xrdp remote desktop protocol server. Note that Remmina is currently only available for Linux/BSD distributions.
This tutorial was successfully tested on client and server machines running Debian 10 (buster).
1. Install Remmina on client machine
In this tutorial, we chose the Remmina remote desktop client to manage the SSH/RDP connection to the Dom0/RDP server. You can install Remmina on the client computer using apt-get as follows:
user@client:~$ sudo apt-get install remmina
The Remmina RDP/SSH connection profile will be created in Step 3, once the RDP server is installed and configured.
2. Install xrdp on server machine
Next, the xrdp remote desktop protocol server is installed and configured to permit incoming RDP connections.
user@server:~$ sudo apt-get install xrdp
For the most part, xrdp is ready to go after installation. However, one major configuration step is required or the RDP connection will fail: the user “xrdp” must be added to the “ssl-cert” group otherwise xrdp cannot access the SSL certificate needed to authenticate the RDP connection.
user@server:~$ sudo adduser xrdp ssl-cert
Note that if you fail to make this configuration change, the RDP connection won’t be accepted and the following error message will be appended to the xrdp log file, /var/log/xrdp.log:
[ERROR] Cannot read private key file /etc/xrdp/key.pem: Permission denied
Once the configuration change is made xrdp should be ready to go. However, if the error occurs again, verify that xrdp has been successfully added to the ssl-cert group by executing the “groups” command, and try restarting the xrdp process using systemctl:
user@server:~$ groups xrdp
xrdp : xrdp ssl-cert
user@server:~$ sudo systemctl restart xrdp
3. Create Remmina connection to Dom0
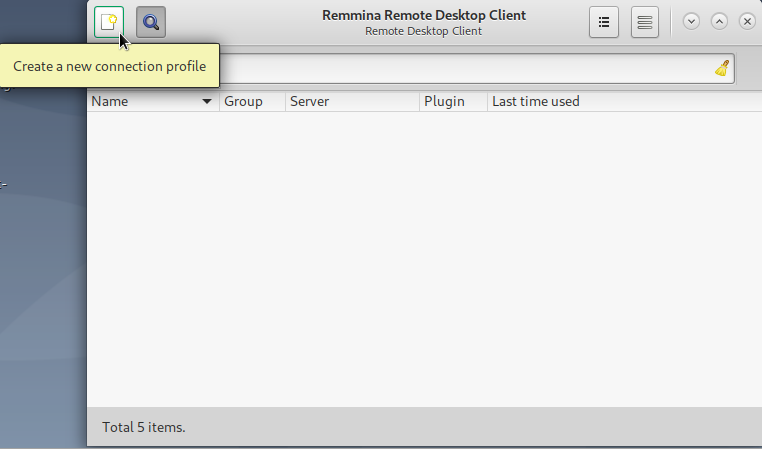
Now that the required packages are installed, it’s time to configure the client computer’s connection to the RDP server. In Remmina’s main window, click the button to “Create a new connection profile”.
Create a new connection profile in Remmina
Start by naming the connection. We’ve chosen to name it “RDP-xen-dom0” so it’s distinguishable from other connection profiles.
Under the “Basic” tab, we’ve indicated under “Server” that the RDP connection will be made to “localhost”. This is because the client computer is first going to connect to the server via SSH, then the RDP session will tunnel through the SSH connection from the server to the same server (aka localhost) on port 3389.
This might be a bit confusing at first, but remember the order of the connections: (1) the client connects to the server via SSH, then (2) the RDP session is tunneled to the server through the client/server SSH connection.
Remmina’s “Basic” tab
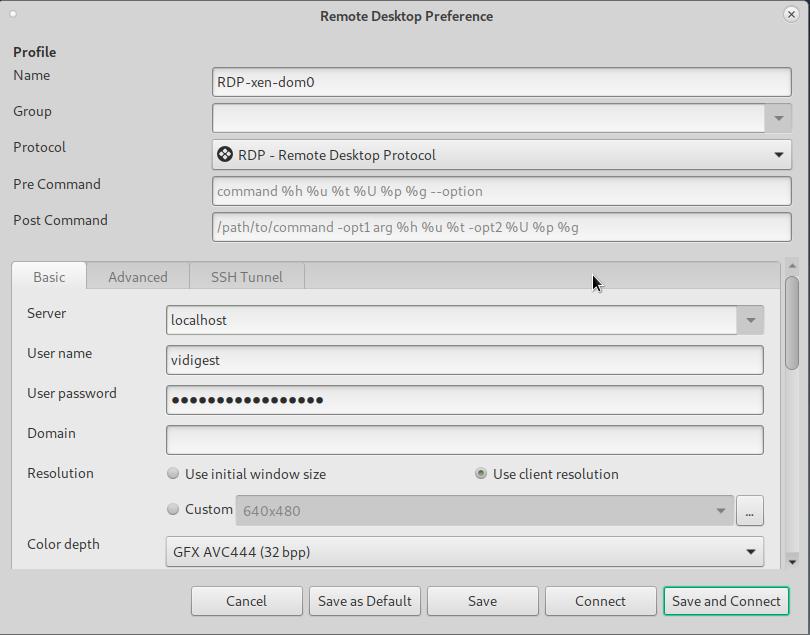
Enter the RDP “user name” and “password” in Remmina’s Basic tab as well. Use the login information from the user on your Dom0/RDP server machine for which you want desktop access. In our case, the Dom0/RDP server has a user named “vidigest”.
Note that we selected “Use client resolution”, but you may select whichever resolution setting fits your purpose.
Next, we configure the SSH tunnel using the “SSH Tunnel” tab.
Remmina’s “SSH Tunnel” tab
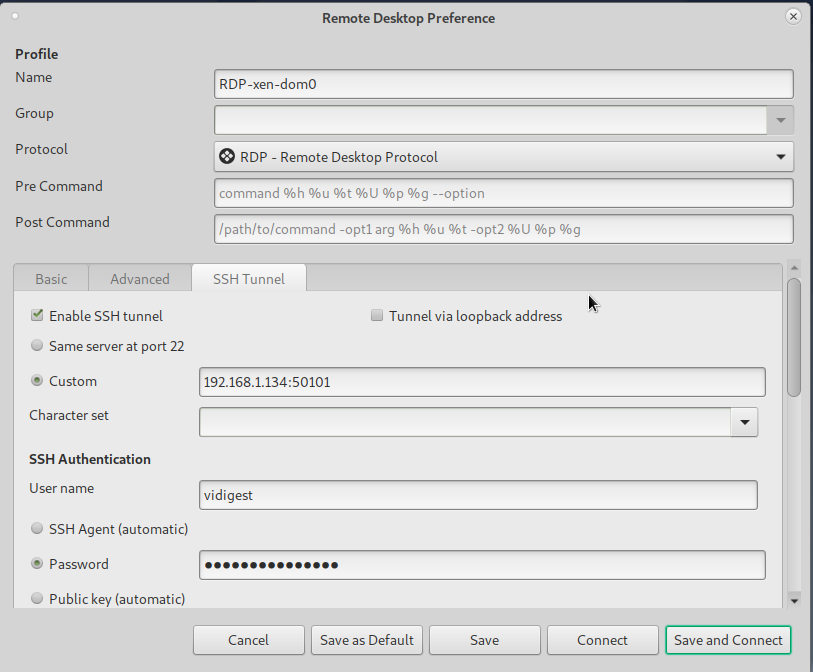
Select the box “Enable SSH tunnel” to turn on the feature.
In this tutorial, the SSH connection request will be sent from the client computer to a firewall/router with an IP address of 192.168.1.134, port 50101. The router is configured for port forwarding and will forward this SSH connection request to the Dom0 located inside the LAN (IP 10.0.0.101, port 22).
Finally, in the “SSH Tunnel” tab, you must enter the user name and password (or other authentication information) of the user on your Dom0/RDP server machine for which to initiate the SSH session. In our case, the Dom0/RDP server has a user named “vidigest”.
In summary, the SSH/RDP connection as configured above occurs as follows:
- the Remmina client sends out a request for a SSH connection from user vidigest to the firewall/router at IP 192.168.1.134, port 50101;
- the firewall/router uses port forwarding to pass this request to the Dom0/RDP server located on the LAN at IP 10.0.0.101, port 22;
- once the SSH connection is negotiated between the client and server, Remmina initiates a RDP connection from user vidigest through the SSH session to the Dom0/RDP server; and,
- all subsequent RDP communication between the client and server are passed through the secure SSH connection.
Alternative configurations with client and server on same network
If the LAN is secure, the user may decide to use RDP only for their connection and ignore the SSH tunnel. In that case, the “SSH Tunnel” tab would be left blank, and the user would only fill in Remmina’s “Basic” tab information.
Let’s imagine a scenario where a client with IP 10.0.0.100 wants to connect through RDP to a user named vidigest located on a RDP server machine with IP 10.0.0.101. Both client and server are on the same secure network. The only information required would be the RDP server IP 10.0.0.101 entered in the “Server” configuration area of the Basic tab, and vidigest’s user name and password.
If the LAN is not secure and a SSH tunnel is desired, both “Basic” and “SSH Tunnel” tabs should be configured. Per the scenario described above, in Remmina’s “Basic” tab, the “Server” IP would be entered as 10.0.0.101 and vidigest’s user name and password would be filled in. For the “SSH Tunnel” tab, make sure to select “Enable SSH tunnel” and “Same server at port 22”, and enter vidigest’s user name and password information. This configuration creates a RDP over SSH connection when the client and server are on the same unsecured network.