In this series of posts, we look at four methods of attaching or passing-through a USB drive to a Xen Project paravirtualized (“PV”) virtual machine.
The four methods discussed in this series include:
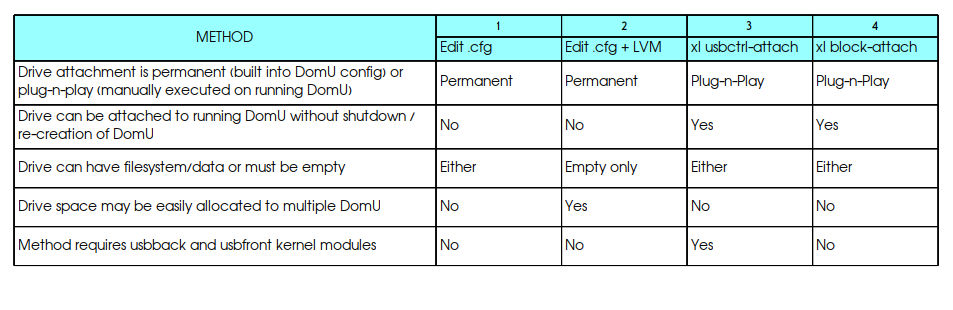
- using the DomU .cfg file to pass-through a formatted drive containing an existing filesystem;
- using the DomU .cfg file and LVM to pass-through a previously unformatted drive;
- using the xl usbctrl-attach and xl usbdev-attach commands; and,
- using the xl block-attach command to pass-through a drive to a running DomU.
As the first three USB pass-through methods were covered in previous posts, linked above, we now move on to the fourth and final method.
Using the xl block-attach Command
Unlike the xl usbctrl-attach command covered in the previous post, xl block-attach worked for me right away without any issues.
To those of you who skipped over the xl usbctrl-attach method, here’s a recap: xl usbctrl-attach and xl usbdev-attach only work if you have the required kernel modules in your Xen Project hypervisor setup. My particular setup does not have the required modules.
Given the success I had with xl block-attach, and the issues with xl usbctrl-attach, for me this method was the only way to pass-through a USB disk device to a running DomU. For emphasis I’ll repeat it again, xl block-attach successfully passed-through a USB drive to a running DomU; this is contrasted with the first two methods covered in this series which required the DomU be shut down and re-created.
1. Locate USB Drive Information
Before plugging in the USB drive, check to see what block devices are available on the Dom0 virtual machine using the lsblk command:
$ lsblk
You should see output similar to the following, depending on your computer’s configuration:
NAME                  MAJ:MIN RM   SIZE RO TYPE  MOUNTPOINT
sda                     8:0    0 119.2G  0 disk
--sda1                  8:1    0   243M  0 part  /boot
--sda2                  8:2    0     1K  0 part
--sda5                  8:5    0   119G  0 part
  --sda5_vg0          254:0    0   119G  0 lvm
    --vidi--vg-root   254:1    0 111.4G  0 lvm   /
    --vidi--vg-swap_1 254:2    0   7.6G  0 lvm   [SWAP]
sr0                    11:0    1  1024M  0 rom
Now plug in the USB drive and run lsblk again to get the drive’s device name. You should see the output now includes a new device.
NAME                  MAJ:MIN RM   SIZE RO TYPE  MOUNTPOINT
sda                     8:0    0 119.2G  0 disk
--sda1                  8:1    0   243M  0 part  /boot
--sda2                  8:2    0     1K  0 part
--sda5                  8:5    0   119G  0 part
  --sda5_vg0          254:0    0   119G  0 lvm
    --vidi--vg-root   254:1    0 111.4G  0 lvm   /
    --vidi--vg-swap_1 254:2    0   7.6G  0 lvm   [SWAP]
sdb                     8:16   1   980M  0 disk
sr0                    11:0    1  1024M  0 rom
Note that the new device sdb appeared[1] on the Dom0 used for this tutorial. Make sure to change the commands below to match the block device name found on your computer.
2. Using xl block-attach to Attach USB Device to DomU
Now that we’ve identified the device name of the USB drive, we can run the xl block-attach command to pass-through the drive to a running DomU. Before we do that, let’s list the block devices that are currently attached to the DomU, so we can verify later that a new USB drive has been added to the list.
# xl block-list {name-of-domu}
On my Dom0, executing the xl block-list command resulted in the following output:
# xl block-list {name-of-domu}
Vdev  BE  handle state evt-ch ring-ref BE-path
51713 0   8      4     10     8        /local/domain/0/backend/vbd/8/51713
51714 0   8      4     11     9        /local/domain/0/backend/vbd/8/51714
The above output shows two block devices currently attached to the specified DomU on my system. This list will expand to include a third drive after successfully running xl block-attach to pass-through a USB drive.
Now we’re ready to execute the xl block-attach command and attach the drive:
# xl block-attach {name-of-domu} /dev/sdb,,xvda3
Let’s unpack the xl command example for a moment, specifically the ending disk configuration parameters: /dev/sdb,,xvda3.
Note that the parameter structure used in the above example is positional, which means that each configuration option/value has a dedicated space in the comma-separate string. For non-mandatory values, the script will select defaults. If mandatory values are left out, the command will fail.
For example, executing the xl block-attach command with only the device name parameter returns the following error:
# xl block-attach {name-of-domu} /dev/sdb
command line: config parsing error in disk specification: no vdev specified in `/dev/sdb'
In the parameter structure, there are four available options/values used to configure the disk device being attached to the DomU. The ordered options are as follows: target, format, vdev, and access.
For option one in the xl block-attach command example, “/dev/sdb,,xvda3”, we specified the target value as “/dev/sdb”. Remember earlier we used lsblk to determine that /dev/sdb refers to the USB drive’s location.
By leaving the second value empty, we accepted the default format value of “raw”. This value specifies the format of the image file or block device that’s going to be attached to the DomU.
The third value, vdev, represents the virtual device type/name as seen by the DomU. We specified “xvda3”, which stands for disk type “Xen virtual disk” (aka Xen virtual block device). Note that the vdev value is mandatory.
The fourth value, which represents disk access permissions, was also left empty. Leaving this value empty accepts the default option permitting read/write access (“rw”) to the attached USB drive. Note that the alternative value is “ro”, indicating read only access permissions.
Given the above information, the following two commands are identical in function:
# xl block-attach {name-of-domu} /dev/sdb,,xvda3

# xl block-attach {name-of-domu} /dev/sdb,raw,xvda3,rw
If you’re interested, more information on xl block-attach parameter structure and the available options can be found on xenbits.xen.org.
Now that we have a better understanding of the xl block-attach command, let’s check to see that the USB drive we passed-through earlier shows up under xl block-list:
# xl block-list {name-of-domu}
Vdev  BE  handle state evt-ch ring-ref BE-path
51713 0   8      4     10     8        /local/domain/0/backend/vbd/8/51713
51714 0   8      4     11     9        /local/domain/0/backend/vbd/8/51714
5632  0   8      4     14     274      /local/domain/0/backend/vbd/8/5632
Everything looks good as now there’s a third drive listed.
Next, we’ll pass the Dom0 console to the DomU to check things from that end. Since the DomU is running, we’ll use the xl console command to access the DomU’s terminal:
# xl console {name-of-domu}
Press any key to wake up the console if it appears inactive. Then log in to the DomU virtual machine when prompted.
Now run the lsblk command while logged in to the DomU. You should see the attached USB drive in the resulting output, for example:
$ lsblk
NAME  MAJ:MIN RM   SIZE RO TYPE MOUNTPOINT
xvda1 202:1    0     4G  0 disk /
xvda2 202:2    1 229.1G  0 disk /mnt
xvda3 202:32   1   980M  0 disk
If the passed-through disk shows up in the DomU, you should be good to go. If not, carefully walk through the above steps again to see where things went wrong.
Quick Tip: If you’re in DomU and want to pass the terminal back to Dom0, use the key combination “Ctrl + ]”.
A Note on Detaching USB Drive from DomU
If you want to detach the USB drive from the DomU use the xl block-detach command. You’ll first need to get the USB drive’s specific “Vdev” number, which you can find by running xl block-list.
Note that in the example above the Vdev number assigned to the newly attached drive is “5632”. Here’s an example of how to detach a drive with a Vdev number of 5632:
# xl block-detach {name-of-domu} 5632
Caution! Always make sure to unmount the drive from the DomU before running this command. Executing xl block-detach is analogous to pulling the USB drive out of the physical port of the machine and has the same potential to corrupt data being written to the drive.
3. Mount the Logical Volume in DomU
To test out the attached drive using the DomU virtual machine, you can either temporarily mount the drive to the DomU’s /mnt/ directory using the following command, or mount it permanently within the DomU by editing the /etc/fstab file:
# mount /dev/xvda3 /mnt
Conclusion and Summary
What more can I say? The method worked, and it enabled pass-through of a USB drive without forcing the shut down and re-creation of the DomU. This method is perfect for attaching a USB drive in scenarios where it’s inconvenient or impossible to shut down the DomU.
Since we’ve completed our review of all four DomU USB attach methods, it’s time to summarize our findings. For the sake of simplicity, the major takeaways from this series have been compiled into the following table for ease of comparison.
Table 1: Xen Project USB Attach-Method Comparison
Notes:
1. Note that my Dom0 did not recognize the USB drive when I first plugged it in: the USB drive didn’t show up when I ran lsblk. After some unfruitful research, I shutdown and restarted Dom0 with the USB drive plugged in and it magically fixed the problem.