The following tutorial describes how to install WordPress on a Xen Project PV DomU. This setup is useful for testing and tweaking your WordPress website before its public launch, or for WordPress plugin and theme development.
If you’re looking for LAMP or WordPress installation tips only, have a look at the table of contents and skip down to the appropriate section below.
Table of Contents:
- Create Debian 9 PV DomU
- Configure Debian 9
- Configure MariaDB
- Configure Apache2
- Configure WordPress
- Secure Apache2 / WordPress
- Optional: Create a Second WordPress Instance
1. Create Debian 9 PV DomU
In our first step, we’re going to create a small PV DomU with 512MB ram, 512MB swap, and 4GB of storage. Although these specs are fine for our intended use of the test server, feel free to modify your PV’s allocated resources to suit your project.
For the PV’s operating system (“OS”), we’ll be installing Debian 9 Stretch. However, the steps below were also successfully tested on Debian 10 Buster.
This tutorial assumes you already have Xen Project Hypervisor and Dom0 running on your computer. If you haven’t yet installed Xen, check out Installing Xen Project Hypervisor on Debian 9: An in-depth beginner’s guide.
1.1 Configure and Install Debian 9 PV DomU
In Dom0, execute the following command to create a new PV DomU as root user. For more information on creating PV DomU, check out the tutorial Using xen-tools to Create DomU Virtual Machines in Xen Project Hypervisor.
# xen-create-image --hostname=yoursite --lvm=vg0 --dist=stretch --dhcp --pygrub --swap=512M --memory=512M --size=4G --passwd
During the xen-create-image process, the test machine generated the following output:
General Information
--------------------
Hostname       :  yoursite
Distribution   :  stretch
Mirror         :  http://httpredir.debian.org/debian
Partitions     :  swap            512M  (swap)
                  /               4G    (ext4)
Image type     :  full
Memory size    :  512M
Bootloader     :  pygrub

Networking Information
----------------------
IP Address     : DHCP [MAC: 00:16:3E:9F:94:C7]


Creating swap on /dev/vg0/yoursite-swap
Done

Creating ext4 filesystem on /dev/vg0/yoursite-disk
Done
Installation method: debootstrap
Done

Running hooks
Done

No role scripts were specified.  Skipping

Creating Xen configuration file
Done

No role scripts were specified.  Skipping
Setting up root password
Enter new UNIX password:
Retype new UNIX password:
passwd: password updated successfully
All done


Logfile produced at:
	 /var/log/xen-tools/yoursite.log

Installation Summary
---------------------
Hostname        :  yoursite
Distribution    :  stretch
MAC Address     :  00:16:3E:9F:94:C7
IP Address(es)  :  dynamic
SSH Fingerprint :  SHA256:oJDJxULwyfIu28o/O1wPbZIvbvqlSiV4LTYOejlWsQY (DSA)
SSH Fingerprint :  SHA256:6Aq4FgDOl9RuvqF8TZQSAsYfYO3r6RC+Ez0hv5fGkdA (ECDSA)
SSH Fingerprint :  SHA256:FbyZilYXIVynyKckccOzBdkQaXTJNDhe7kkv84hxvL0 (ED25519)
SSH Fingerprint :  SHA256:6aX3axNnUm7tzugZoK1Anp6/65NFqOn3Z1GhKEnuRmU (RSA)
Root Password   :  N/A
1.2 Start Debian 9 PV Instance
Next we’ll use the xl create command to start the newly generated Debian 9 PV instance. Note that the “-c” option passes Dom0’s terminal to DomU. Use the “CTRL + ]” key combination to go back to Dom0 at any time.
# xl create -c /etc/xen/yoursite.cfg
Login as root user using the password you entered during the PV configuration and installation process, above.
1.3 PV Memory and Disk Statistics
The Debian 9 PV instance created during this tutorial provided the following memory and disk statistics:
# free -h

              total        used        free      shared  buff/cache   available
Mem:           490M         29M        421M        768K         39M        448M
Swap:          511M          0B        511M
# df -h

Filesystem      Size  Used Avail Use% Mounted on
udev            217M     0  217M   0% /dev
tmpfs            50M  768K   49M   2% /run
/dev/xvda2      3.9G  576M  3.1G  16% /
tmpfs           246M     0  246M   0% /dev/shm
tmpfs           5.0M     0  5.0M   0% /run/lock
tmpfs           246M     0  246M   0% /sys/fs/cgroup
2. Configure Debian 9
Now that the DomU is up and running with its fresh Debian 9 OS, let’s install a few packages and create a non-root user.
2.1 Install Packages and Create Non-root User with sudo Privileges
For the sake of security, we shouldn’t be using root user for every task. For this reason, we’re going to install the sudo package and create a user with sudo privileges.
Later on we’ll be using wget to download the WordPress package, so let’s install it now as well.
First we’ll refresh our package listing:
# apt-get update
Then we’ll install the sudo and wget packages:
# apt-get install sudo wget
Now that sudo is installed, we’ll create a user called “foo” (choose whatever user name you want):
# adduser foo
Then we’ll add the user foo to the sudo group:
# usermod -aG sudo foo
Now we can log out from the root user account using the “exit” command, and log back in as our new user foo.
2.2 Install Firewall and Configure for SSH
Keeping with the security theme, we’re going to install a firewall and allow login through SSH. For the purpose of this tutorial, ufw will do the trick.
$ sudo apt-get install ufw
Now we’ll allow incoming TCP connections to the server’s SSH port 22:
$ sudo ufw allow OpenSSH
Next, we’ll turn the firewall on:
$ sudo ufw enable
If you want to make sure that everything was configured properly, use the “ufw status” command:
$ sudo ufw status

Status: active

To                         Action      From
--                         ------      ----
OpenSSH                    ALLOW       Anywhere
OpenSSH (v6)               ALLOW       Anywhere (v6)
2.3 Install Everything Except WordPress Itself
Although you can easily install the wordpress package from the Debian repository, in this tutorial we’ve chosen to use the latest release as provided by wordpress.org. Regardless, we’re going to wait until the LAMP stack is fully installed and configured before installing WordPress.
First we need to install the MariaDB and Apache2 packages and dependencies. These we’ll get from the Debian repository using the following two apt-get commands:
$ sudo apt-get install default-mysql-client default-mysql-server
$ sudo apt-get install apache2 ca-certificates libjs-cropper libapache2-mod-php php-gd php-getid3 php-mysql
3. Configure MariaDB
To get MariaDB ready for WordPress, we’ll run the mysql_secure_installation shell script, then configure a database and database user.
3.1 Secure MariaDB
Execute the mysql_secure_installation script and follow the instructions.
$ sudo mysql_secure_installation
Configuring the test machine generated the following questions and output:
NOTE: RUNNING ALL PARTS OF THIS SCRIPT IS RECOMMENDED FOR ALL MariaDB
      SERVERS IN PRODUCTION USE!  PLEASE READ EACH STEP CAREFULLY!

In order to log into MariaDB to secure it, we'll need the current
password for the root user.  If you've just installed MariaDB, and
you haven't set the root password yet, the password will be blank,
so you should just press enter here.

Enter current password for root (enter for none):
OK, successfully used password, moving on...

Setting the root password ensures that nobody can log into the MariaDB
root user without the proper authorisation.

Set root password? [Y/n] y
New password:
Re-enter new password:
Password updated successfully!
Reloading privilege tables..
 ... Success!


By default, a MariaDB installation has an anonymous user, allowing anyone
to log into MariaDB without having to have a user account created for
them.  This is intended only for testing, and to make the installation
go a bit smoother.  You should remove them before moving into a
production environment.

Remove anonymous users? [Y/n] y
 ... Success!

Normally, root should only be allowed to connect from 'localhost'.  This
ensures that someone cannot guess at the root password from the network.

Disallow root login remotely? [Y/n] y
 ... Success!

By default, MariaDB comes with a database named 'test' that anyone can
access.  This is also intended only for testing, and should be removed
before moving into a production environment.

Remove test database and access to it? [Y/n] y
 - Dropping test database...
 ... Success!
 - Removing privileges on test database...
 ... Success!

Reloading the privilege tables will ensure that all changes made so far
will take effect immediately.

Reload privilege tables now? [Y/n] y
 ... Success!

Cleaning up...

All done!  If you've completed all of the above steps, your MariaDB
installation should now be secure.

Thanks for using MariaDB!
3.2 Create a Database and Database User
Login to mysql as root user using the password set during the mysql_secure_installation stage above. Note that, if you run the command as sudo, you may first have to enter the sudo password, then enter the MariaDB root password.
sudo mysql -u root -p
Now that we’re logged in to MariaDB as root, we’ll create a database user for the WordPress site called “bar”:
MariaDB [(none)]> CREATE USER 'bar'@'localhost' IDENTIFIED BY 'barpassword';
Query OK, 0 rows affected (0.00 sec)
Next, we’ll create a database for the WordPress site:
MariaDB [(none)]> CREATE DATABASE yoursite_db;
Query OK, 1 row affected (0.00 sec)
After that, we need to make sure that the database user is authorized on the new database. We do that with the following command:
MariaDB [(none)]> GRANT ALL ON yoursite_db.* TO 'bar'@'localhost';
Query OK, 0 rows affected (0.00 sec)
Flush the privileges…
MariaDB [(none)]> FLUSH PRIVILEGES;
Query OK, 0 rows affected (0.00 sec)
And exit…
MariaDB [(none)]> exit;
Bye
If you want to make sure that everything was configured properly, while logged in to MariaDB, check what databases are available with the following command:
MariaDB [(none)]> SHOW DATABASES;
+--------------------+
| Database           |
+--------------------+
| information_schema |
| mysql              |
| performance_schema |
| yoursite_db        |
+--------------------+
4 rows in set (0.00 sec)
Users can be checked by executing the following:
MariaDB [(none)]> SELECT User,Host FROM mysql.user;
+----------+-----------+
| User     | Host      |
+----------+-----------+
| root     | localhost |
| yoursite | localhost |
+----------+-----------+
2 rows in set (0.00 sec)
4. Configure Apache2
With the database and database user ready to go, the next step is to configure Apache2.
4.1 Check If Apache2 Module “mod_rewrite” is Enabled
For pretty permalinks and HTTP/HTTPS redirection, our WordPress configuration will need the Apache2 rewrite module enabled. If you’re not sure you’ll need mod_rewrite for your particular setup, feel free to skip this step now as it can be configured later if necessary.
First we’ll check if the rewrite module is already enabled by looking in the “/etc/apache2/mods-enabled/” directory:
$ ls /etc/apache2/mods-enabled/
access_compat.load  authz_user.load  filter.load       php7.0.load
alias.conf          autoindex.conf   mime.conf         reqtimeout.conf
alias.load          autoindex.load   mime.load         reqtimeout.load
auth_basic.load     deflate.conf     mpm_prefork.conf  setenvif.conf
authn_core.load     deflate.load     mpm_prefork.load  setenvif.load
authn_file.load     dir.conf         negotiation.conf  status.conf
authz_core.load     dir.load         negotiation.load  status.load
authz_host.load     env.load         php7.0.conf
It’s not in the output, so we’ll enable the rewrite module using the “a2enmod” command:
$ sudo a2enmod rewrite
Enabling module rewrite.
To activate the new configuration, you need to run:
  systemctl restart apache2
Since there are more apache2.conf configurations needed, we’ll wait until we’re all done to restart the apache2 unit.
4.2.1 Configure apache2.conf to Disable Indexes
The next step is to configure Apache2 to restrict website visitors’ access to server directories, also known as “directory browsing”. In the apache2.conf file, we’ll be removing “Indexes” from the Options line.
Here’s what the section looks like before:
<Directory /var/www/>
    Options Indexes FollowSymLinks
    AllowOverride None
    Require all granted
</Directory>
And this is what the section looks like after Indexes is removed:
<Directory /var/www/>
    Options FollowSymLinks
    AllowOverride None
    Require all granted
</Directory>
Note that we’re keeping “AllowOverride None” because our setup doesn’t require .htaccess files. And, we’re also leaving “Require all granted” so any user can access our website’s content stored under /var/www/ (unless specifically restricted, as configured below).
4.2.2 Configure apache2.conf to Restrict Access to /usr/share Directory
The next step is optional but, since were not using the “/usr/share” directory for our website configuration, it seems more secure to remove access to it from the apache2.conf file.
This is the original /usr/share section in the apache2.conf file that we’ll comment out:
<Directory /usr/share>
    AllowOverride None
    Require all granted
</Directory>
And this is what it looks like with the four lines commented out:
#<Directory /usr/share>
#   AllowOverride None
#   Require all granted
#</Directory>
4.2.3 Configure Apache2.conf to Add Global ServerName
Since there were recurring error messages in the apache log files of the test server, located at “/var/log/apache2/error.log”, it was decided to add a global “ServerName” directive to the apache2.conf file.
The recurring message in the error.log file, which occurred on server restart, was as follows:
AH00558: apache2: Could not reliably determine the server's fully qualified domain name,
using 127.0.1.1. Set the 'ServerName' directive globally to suppress this message
To fix this message, the ServerName directive and test server IP address 10.0.0.113 were added to the apache2.conf file. Make sure to use the IP address of your server.
ServerName 10.0.0.113
4.3 Disable 000-default.conf, and Create and Configure 000-yoursite.conf
Now that the apache2.conf file global directives are set, it’s time to create our “virtual host” conf file. First we’ll disable the Apache2 default virtual host “000-default.conf”, which is located in the “/etc/apache2/sites-enabled/” directory.
To see what virtual hosts are enabled, use “ls” to list the directory contents of /etc/apache2/sites-enabled/:
$ ls /etc/apache2/sites-enabled/
000-default.conf
Next, we’ll disable the Apache2 default virtual host using the “a2dissite” command:
$ sudo a2dissite 000-default.conf
Site 000-default disabled.
To activate the new configuration, you need to run:
  systemctl reload apache2
Now, we’ll change to the directory where the Apache2 virtual hosts are stored, “/etc/apache2/sites-available/”:
$ cd /etc/apache2/sites-available
And, make a copy of the 000-default.conf file so we can use it as the base for the new virtual host conf file called “000-yoursite.conf”:
$ sudo cp 000-default.conf 000-yoursite.conf
Now we’ll edit the new conf file to suit our website’s purposes:
$ sudo nano 000-yoursite.conf
4.3.1 Apache2 Virtual Host Configuration
We need to change the virtual host’s DocumentRoot to the directory where WordPress is going to be installed. For this tutorial, we’ll create a directory called “yoursite” inside the /var/www/ directory. Don’t worry, we haven’t created the “yoursite” directory yet, this will be done when we install WordPress.
In the virtual host configuration file we’ll anticipate the creation of “/var/www/yoursite” and add that as the DocumentRoot. Change the following line in “000-yoursite.conf”:
DocumentRoot /var/www/html
to…
DocumentRoot /var/www/yoursite
Then we’ll add in the ServerName and ServerAlias directives, and some rewrite module code to enable pretty permalinks and redirection, after the line “<VirtualHost *:80>”:
ServerName yoursite.site
ServerAlias www.yoursite.site
and…
<Directory /var/www/yoursite>
    RewriteEngine On
    RewriteBase /
    RewriteRule ^index\.php$ - [L]
    RewriteCond %{REQUEST_FILENAME} !-f
    RewriteCond %{REQUEST_FILENAME} !-d
    RewriteRule . /index.php [L]
</Directory>
The 000-yoursite.conf file now has the following un-commented code:
<VirtualHost *:80>

    ServerName yoursite.site
    ServerAlias www.yoursite.site
    ServerAdmin webmaster@localhost
    DocumentRoot /var/www/yoursite

    <Directory /var/www/yoursite>
        RewriteEngine On
        RewriteBase /
        RewriteRule ^index\.php$ - [L]
        RewriteCond %{REQUEST_FILENAME} !-f
        RewriteCond %{REQUEST_FILENAME} !-d
        RewriteRule . /index.php [L]
    </Directory>

    ErrorLog ${APACHE_LOG_DIR}/error.log
    CustomLog ${APACHE_LOG_DIR}/access.log combined

</VirtualHost>
Now that we’ve finished the preliminary virtual host configuration, we can load the virtual server and restart the apache2 unit.
To load the virtual host run the following command:
$ sudo a2ensite 000-yoursite.conf
Enabling site 000-yoursite.
To activate the new configuration, you need to run:
  systemctl reload apache2
Then we’ll reload apache2:
$ sudo systemctl reload apache2
5. Configure WordPress
With MariaDB and Apache2 ready to go, we can download, install and configure WordPress.
5.1 Download and Install WordPress Package
For this step we’ll download the latest release of WordPress from wordpress.org to the user’s home directory, “/home/foo/”:
$ cd /home/foo
$ wget https://wordpress.org/latest.tar.gz
Next, we’ll use the tar command to extract the contents of the downloaded archive file into the current directory. This should automatically create a directory called “wordpress” containing all the required WordPress files.
$ tar xzf latest.tar.gz
Now we’ll remove the unneeded “index.html” file stored in the “/var/www/html/” directory, then change the /var/www/html/ directory name to “/var/www/yoursite/”. Naming the directory as such makes it easier to add new WordPress instances in the future.
$ sudo rm /var/www/html/index.html
$ sudo mv /var/www/html/ /var/www/yoursite
With the directory in place, copy the contents of the wordpress folder to “/var/www/yoursite”:
$ sudo cp -r wordpress/* /var/www/yoursite
Last, we’ll use chown and chmod to provide required ownership and read/write/execute permissions to the newly installed WordPress files and directories:
$ sudo chown -R www-data:www-data /var/www/yoursite
$ sudo find /var/www/yoursite -type d -exec chmod 755 {} \;
$ sudo find /var/www/yoursite -type f -exec chmod 644 {} \;
5.2 Configure Firewall for HTTP/HTTPS
Now that WordPress is installed on the server, in order to finish its setup and connect it to the database, we’ll need to access it via a web browser. However, remember that we’ve configured the firewall to only allow SSH connections, so let’s change the firewall setting to allow for HTTP/HTTPS.
We’ll pass the “WWW Full” value to ufw allowing incoming traffic on ports 80 and 443:
$ sudo ufw allow "WWW Full"
Then we’ll do a quick check on the status of the firewall, which should result in the following output:
$ sudo ufw status verbose

Status: active
Logging: on (low)
Default: deny (incoming), allow (outgoing), disabled (routed)
New profiles: skip

To                         Action      From
--                         ------      ----
22/tcp (OpenSSH)           ALLOW IN    Anywhere
80,443/tcp (WWW Full)      ALLOW IN    Anywhere
22/tcp (OpenSSH (v6))      ALLOW IN    Anywhere (v6)
80,443/tcp (WWW Full (v6)) ALLOW IN    Anywhere (v6)
With the WordPress setup process open to the world, we should either use a web browser on a client machine to go to the server’s IP address ASAP, or turn the HTTP/HTTPS firewall allow rules off until we’re ready to finish the setup.
5.3 WordPress Installation Process
Once connected to the server via the client’s web browser, follow the steps to set up the WordPress site. Remember to use the MariaDB database name, user name, and password you created above (for the test server the values we used above were: “yoursite_db”, “bar”, and “barpassword”).
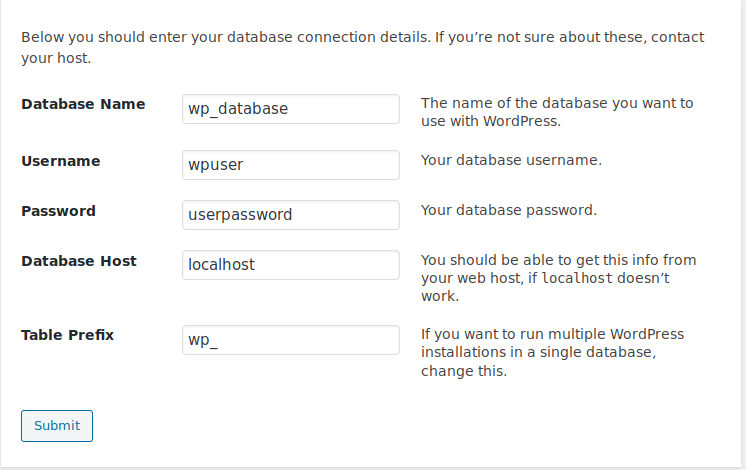
As the database is hosted on the same machine, the Database Host value of “localhost” is correct. To make it easier to add other WordPress sites to the database in the future, use a custom Table Prefix such as “your_”.
For security reasons, we’ll create a separate admin user name for the WordPress site, which will be different from the name(s) we’ll use for our public posts. Sticking with the foobar theme, the WordPress admin will be “snafu”, and we’ll use a secure password.
Note that you may not want to set the “WordPress Address” and “Site Address” values until DNS to the server is working. However, if you insist, you can modify the “/etc/hosts” file on a client machine adding the IP address of the server and domain name/address as configured in Apache2/WordPress.
Adding this line to the /etc/hosts file of the client machine will allow you to hit the site from its web browser:
10.0.0.113 yoursite.com www.yoursite.com
At this point, your WordPress site should be up and running, and ready for further personalized configuration and/or content management.
6. Secure Apache2 / WordPress
If you’re planning on going public with your website, here are a few configurations to better secure WordPress against attackers.
6.1 Remove Unneeded Files
If you won’t be needing the “readme.html” and “license.txt” files in the website’s root directory, you might as well delete them. Same goes for “wp-config-sample.php”, which isn’t needed after WordPress is all configured.
Remove the three files with the following commands:
$ sudo rm /var/www/yoursite/readme.html
$ sudo rm /var/www/yoursite/license.txt
$ sudo rm /var/www/yoursite/wp-config-sample.php
6.2 Deny Access to .php Files in Select Directories
Blocking the ability to run .php files in the /wp-includes/ and /wp-content/uploads/ directories helps protect the core WordPress system from attackers uploading and executing malicious .php files.
If this configuration suits your security profile, consider adding the following code to the virtual host configuration file located in the “/etc/apache2/sites-available/” directory.
Open the 000-yoursite.conf file with nano, and add the following code:
$ sudo nano /etc/apache2/sites-available/000-yoursite.conf
<Directory /var/www/yoursite/wp-includes>
    <Files "*.php">
        Order Deny,Allow
        Deny from all
    </Files>
</Directory>

<Directory /var/www/yoursite/wp-content/uploads>
    <Files "*.php">
        Order Deny,Allow
        Deny from all
    </Files>
</Directory>
Note that changes will not take effect until the apache2 unit is reloaded/restarted.
$ sudo systemctl reload apache2
6.3 Deny Access to wp-config.php File in Core Directory
The “wp-config.php” file is an important file in the WordPress core. It contains database information (database name, user name, and password), and other essential configuration settings best kept private.
To deny attackers access to this file, add the following code to the virtual host’s conf:
$ sudo nano /etc/apache2/sites-available/000-yoursite.conf
Include the following code under the heading “<Directory /var/www/yoursite>”:
<Files "wp-config.php">
    Order Deny,Allow
    Deny from all
</Files>
Note that changes will not take effect until the apache2 unit is reloaded/restarted.
$ sudo systemctl reload apache2
6.4 Deny Access to xmlrpc.php File in Core Directory
Some third-party apps use “xmlrpc.php” to connect to WordPress for site management. If you’re not using a third-party app to connect to WordPress, access to xmlrpc.php should be restricted: the file is a highly targeted access point for attackers.
To deny attackers access to xmlrpc.php, add the following code to the virtual host’s conf file:
$ sudo nano /etc/apache2/sites-available/000-yoursite.conf
Include the following code under the heading “<Directory /var/www/yoursite>”:
<Files "xmlrpc.php">
    Order Deny,Allow
    Deny from all
</Files>
Note that changes will not take effect until the apache2 unit is reloaded/restarted.
$ sudo systemctl reload apache2
6.5 Password Protect /wp-admin/ and wp-login.php
Most WordPress attackers wanting root access to the website go about achieving this goal by brute-forcing username/password combinations. Securing login credentials by adding a second layer of authentication is one of many protections against this type of attack.
Although it’s more secure to employ authentication and authorization features combined with the Apache2 SSL module, “mod_ssl”, configuring HTTPS/SSL may be overkill for a test server on your local network.
If you’re planning on opening the website to the world, HTTPS/SSL is more easily implemented on a public website with DNS properly configured. More information on configuring HTTPS/SSL is provided below for those interested.
For now, we’ll setup authentication over HTTP, which means that credentials are passed unencrypted over the local network.
6.5.1 Check for Enabled Apache2 Modules
First we’ll make sure that the modules “mod_authn_core” and “mod_authz_core” have either been built into the httpd binary or loaded by the httpd.conf configuration file. The easiest way to do this is by listing the directory contents of “/etc/apache2/mods-enabled/”:
$ ls /etc/apache2/mods-enabled
access_compat.load  authz_user.load  filter.load       php7.0.load
alias.conf          autoindex.conf   mime.conf         reqtimeout.conf
alias.load          autoindex.load   mime.load         reqtimeout.load
auth_basic.load     deflate.conf     mpm_prefork.conf  rewrite.load
authn_core.load     deflate.load     mpm_prefork.load  setenvif.conf
authn_file.load     dir.conf         negotiation.conf  setenvif.load
authz_core.load     dir.load         negotiation.load  status.conf
authz_host.load     env.load         php7.0.conf       status.load
From this output we can see that the modules we need were enabled by default.
6.5.2 Create Password Directory and Run htpasswd Script
Next we’ll create a secure directory to store and create the htpasswd passwords file. By secure directory, we mean that the directory should not be in the website/WordPress directory path.
We’ll create the secure directory in “/etc/apache2/” and call it “passwd”:
$ sudo mkdir /etc/apache2/passwd
Now we can run the htpasswd script to create the password file. Note that the “-c” option creates a new file, otherwise the program will append an existing file. The command also contains the path to the directory/filename containing the password file, “/etc/apache2/passwd/yoursite”, and the authorized user to add. In our example the user is “foo”.
$ sudo htpasswd -c /etc/apache2/passwd/yoursite foo
New password: mypassword
Re-type new password: mypassword
Adding password for user foo
Consider using a different user/password combination for each layer of authentication; for example, one combo for the htpasswd layer and a second combo for the WordPress layer.
6.5.3 Update the Virtual Host Conf File
After the password file is created, complete the htpasswd configuration by including the following code under the heading “<Directory /var/www/yoursite>” in the virtual host’s conf file:
$ sudo nano /etc/apache2/sites-available/000-yoursite.conf
<Files "wp-login.php">
    AuthType Basic
    AuthName "Restricted Files"
    # (Following line optional)
    AuthBasicProvider file
    AuthUserFile "/etc/apache2/passwd/yoursite"
    Require user foo
</Files>
Make sure to change “AuthUserFile” to the path of your password file, and “Require user” from “foo” to whatever name you chose during the htpasswd process, above.
Note that changes will not take effect until the apache2 unit is reloaded/restarted.
$ sudo systemctl reload apache2
Now is the time to test whether this works for the following website directories and files: /login, /wp-login.php, /admin, /wp-admin, or clicking the “Log In” link the menu. Don’t actually login until you’ve tested all five ways!
Note that the site directory “/wp-admin/” redirects to “/wp-login.php”, so protection is only needed on the latter.
For more configuration information, check out the official Apache2 documentation here.
6.6 Optional: Configure HTTPS/SSL
If your site is public facing and DNS is setup and working using HTTP, then it is fairly easy to configure HTTPS/SSL using the certbot command.
First you’ll need to install the certbot package:
$ sudo apt-get install certbot python-certbot-apache
Then run certbot with the “–apache” flag:
$ sudo certbot --apache
It’s as simple as following the steps in terminal; no further information is needed. To learn more about certbot check out its official site here.
7. Create Second WordPress Site on Server
For information on how to add a second WordPress website to your server, see Create Second WordPress Site on Server.